
VMwarevCloud Network and Security (vCNS), also used to be called vShield, provides network
and network services for virtual environments like VMware vSphere and VMware vCloud Director.
vCNS leverages routing services through vCNS Edge, which also provides firewalling,
NAT, VPN, DHCP, VXLAN, You can also implement an agentless antivirus solution
with vCNS Endpoint, all of that in a matter of minutes.
But the management of all these
services are handle by a single component, vCNS Manager.
I know
there is a lot of information about how to implement it out there, but for my
own records and why not help others, I’d like to create my own step by step
procedure on how to install vCNS Manager.
First
download the appliance from VMware Web site.
Yes you heard it right!! It’s a
virtual appliance, easy to implement, I bet you are already enjoying it ; )
From
vSphere Client start the process of deploying the appliance
- Select
the OVF file you just downloaded and click Next

- Review
the details and click Next

- Accept
the EULA and click Next

- Give it a
name and select the Datacenter where to deploy it. Click Next

- Select
the Cluster where to deploy it and click Next

- Select the Resource Pool where to deploy it and click Next

- Select
the Datastore where to store the vCNS Manager disks and click Next

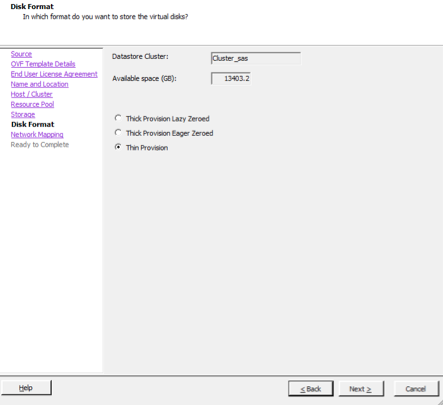
- Select the
Disk Format and click Next
Thin disk
is perfectly OK for vCNS Manager.
- Select
the correct Port Group for the appliance and click Next

- Review
the Information and click Finish

The deploy will just starts up and a progress bar will be shown

Once
deployed we need to configure it.

Throug vSphere Client open vCNS Manager console.
Login in with User: Admin and password: default
Run enable command to enter into a privileged session
Run setup to start the configuration script
- fill with your network information
allow at least few minutes before attempting to configure it. So the appliance can starts all it’s services .

Once
Configure you can access it through your WebBrowser. ( https://”vCNS-Manager" )
- Login again with the above credentials to finish the configuration

Let’s
starting changing this default password
- Click on
the Change Password link
Type a new
password and click OK.

At the main
page, you have the option to configure several parameters, while some of them
are not required, I strongly advise to configure them all.
- Click on
the Edit button to starting configuring each one of them

Obviously
vCenter Server is the critical one.
- Click on
Edit and then fill the information about your vCenter server and a credential
with Administrator privileges on it. Click OK.

- Just
click Yes on the certificate warning

Now we just
need to license the product.
- On the
Licenses page select vCloud Network and Security, right click on it and select
change license key.

- Just pick
up the right license and click OK

That’s all folks !!!
Easy, right ?!?! You are now ready to start creating your own virtual network
services.


